


TL-WR1043ND - Optware Installation (OpenWRT on DD-WRT)
This is no ordinary Microsoft Excel & Words, it really took me some time to read through, tested few times just to make it work, indeed challenge for a non-Linux junior like me .... 
Basically I followed the reference & guide below: (thank you & credit goes to them  )
)
http://g300nh.blogspot.com/2010/06/software-installation-on-dd-wrt-part-1.html
http://g300nh.blogspot.com/2010/06/software-installation-on-dd-wrt-part-2.html
http://www.dd-wrt.com/phpBB2/viewtopic.php?t=86912
Note:
- This installation is based on DD-WRT build r14929, which I've tested and seem to be stable compared to other builds
- The Optware & packages is based on the stable version OpenWRT Backfire 10.03.1-rc4
Pre-requisite:
- Read the above links and understand those steps clearly, copy those command lines on a Notepad in activity sequence, make sure you know what variable need to be changed accordingly. If not really sure how to do it, then stop, don't continue any further!!
- Prepare a USB2 external HDD or thumb drive, use EASEUS (Windows-base) or GParted (Linux-base) to create and format Ext3 filesystem.
- I'm a Windows user, so I download and install the following applications on my Win7 computer:
- Learn and familiar with the above applications, at least must know how to access and login the device.
- Device already flashed with DD-WRT, always hard re-set both BEFORE & AFTER flashing any firmware.
Please don't email and ask me if you hit any problem, I won't be able to help you much as I'm also newbie to Linux command  .
.
I followed the guide above with some minor changes, been testing for few times, actually it's quite straight forward, almost like "copy & paste", eventually it works for me.
So, please go read & try again, have fun, it should work !
Prepare A USB2 External HDD or Thumb Drive
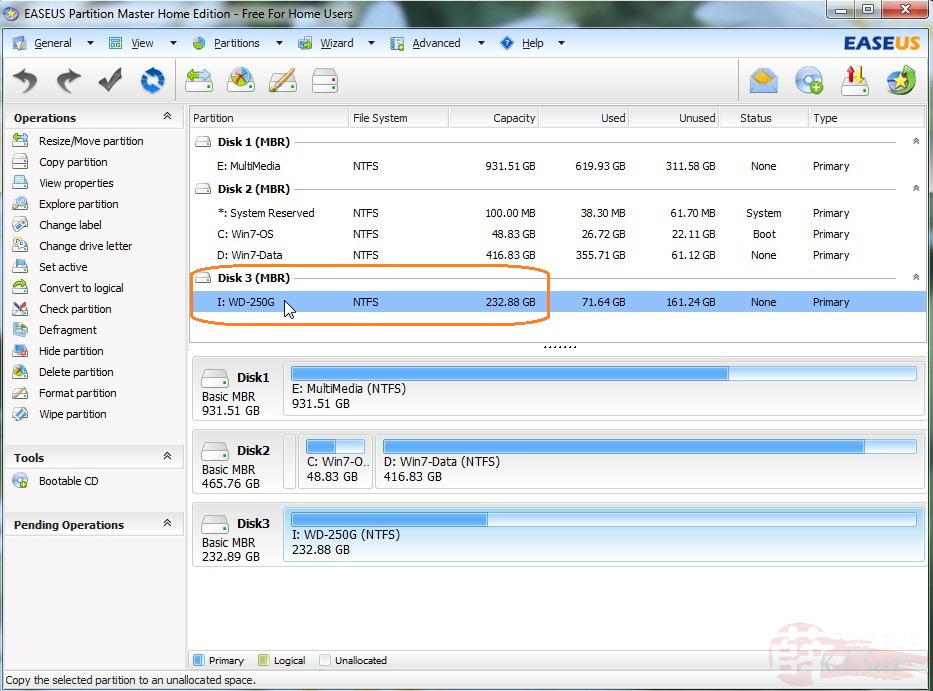
After installed the EASEUS, plug-in the USB2 external HDD or thumb drive, launch the program.
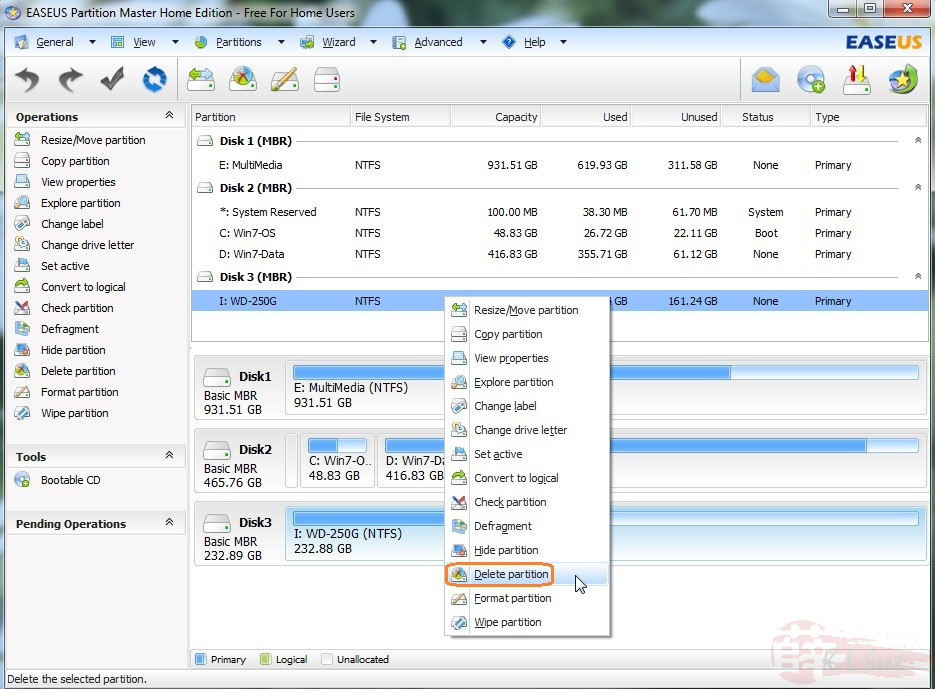
If the drive already formatted before, click on the drive, right-click to delete the existing partition.
Warning: Make sure you select the correct drive !!
right-click to delete the existing partition.
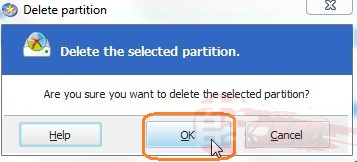
OK to confirm.
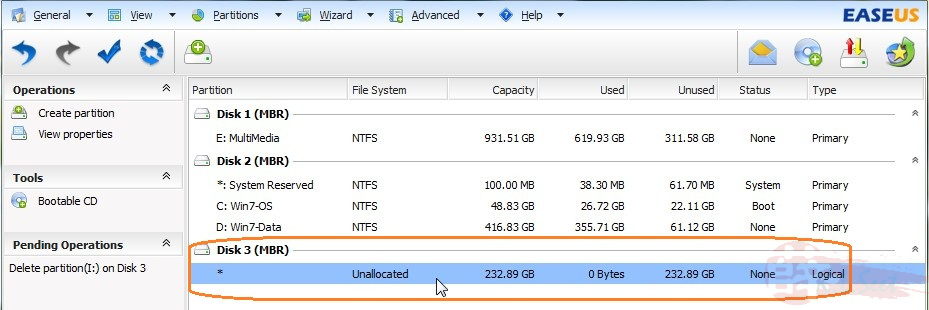
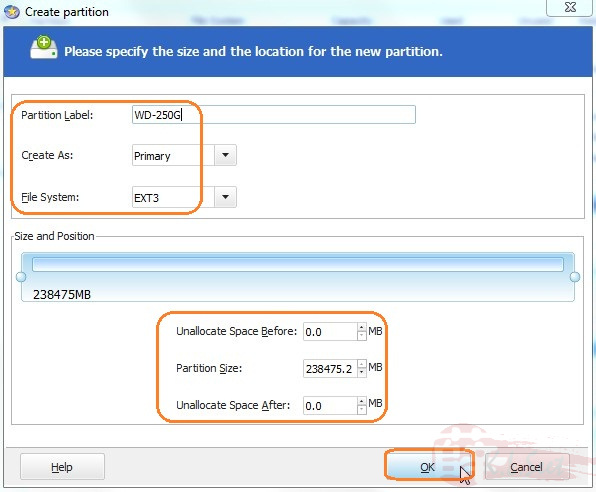
Now the drive show "Unallocated", click on the drive, righ-click to create new partition
enter the desire drive label, create as "Primary" with "EXT3" file system, choose the desire size.
Note: I choose to go 1 partition full size only on DD-WRT since the current builds somehow does not support SwapFile. Whereas for OpenWRT I'll create 2 partition with 1 smaller partition for SwapFile usage.
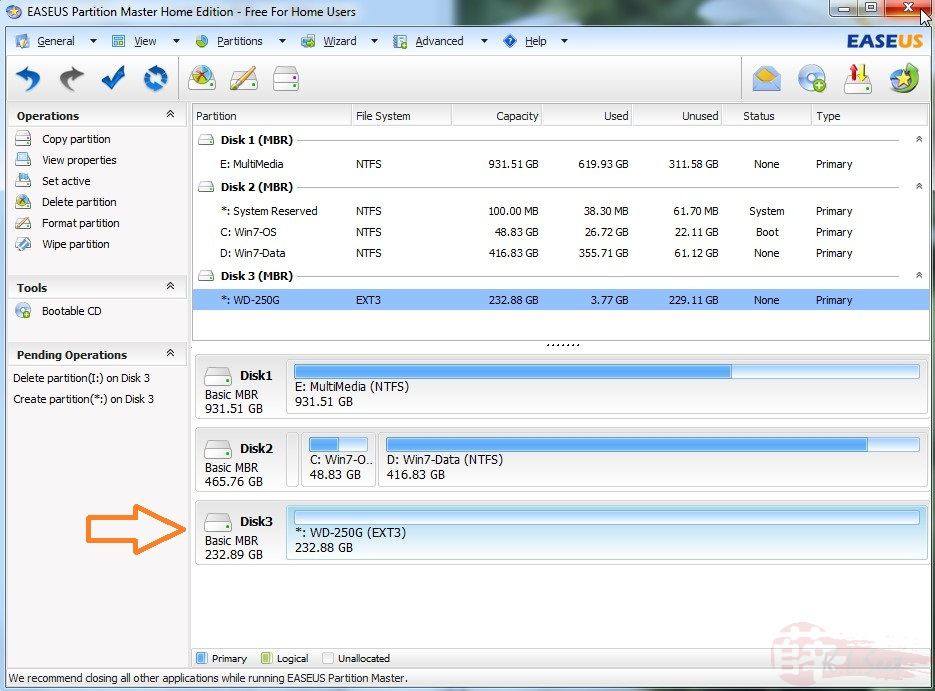
Double check the drive disk again, once confirmed click the Close button on top right.
It will prompt you the following, click Yes to continue.
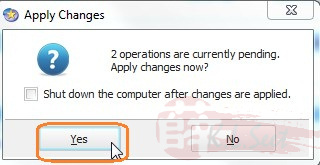
DO NOT move a muscle until the process complete!
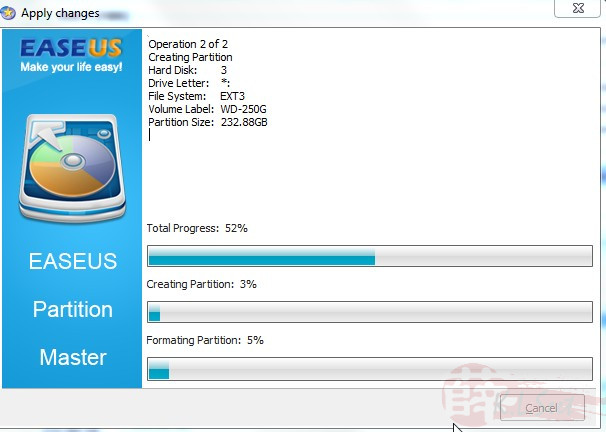
Complete, clock OK, unplug the USB2 drive, continue to next section.

Install Optware
Note: Make sure the device is accessible to internet.
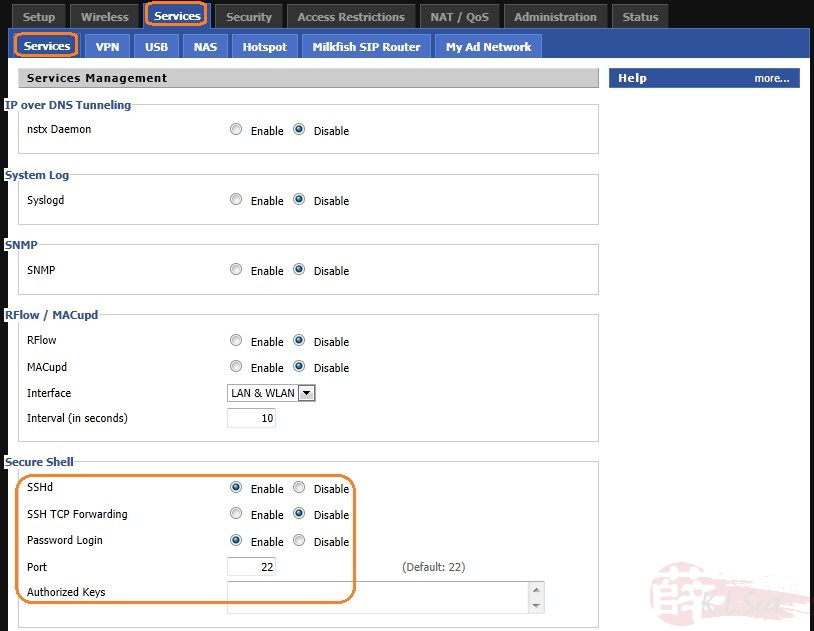
Go to "Services --> Services tab", enable the SSH for PuTTY access
Go to "USB tab", setup as follows.
Note: I prefer to manually mount HDD for older build like r14929. For newer build, can choose Auto and select mount point to "/mnt"

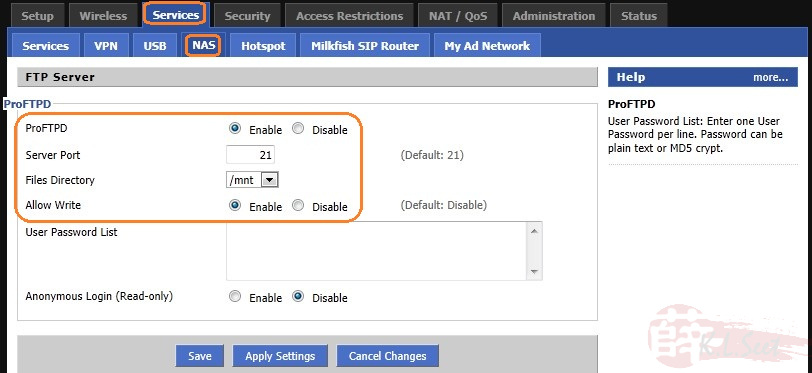
Go to "NAS tab", enable the FTP service.
Go to "Administration --> Management tab", re-confirm the JFFS2 service is disabled.
Once done, plug-in the USB drive, reboot the device.
Get ready those command lines on a Notepad text file.
Launch the PuTTY, enter the device's IP, choose Connection Type "SSH", user ID and password is the one you first setup the DD-WRT on your device.
Once connected to the device, type:
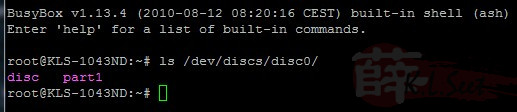
ls /dev/discs/disc0/
should see the following drive information
Type:
mount -t ext3 -o noatime /dev/discs/disc0/part1 /mnt
to mount the USB drive manually

Now type the following:
[enter 1 line at a time, wait for the process to complete, until you see the "#", then the next line again.]
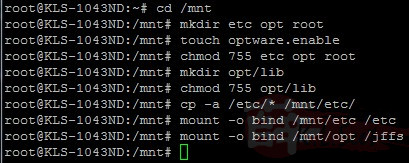
cd /mnt
mkdir etc opt root
touch optware.enable
chmod 755 etc opt root
mkdir opt/lib
chmod 755 opt/lib
cp -a /etc/* /mnt/etc/
mount -o bind /mnt/etc /etc
mount -o bind /mnt/opt /jffs
Now it's ready to download and install the Optware package for the Atheros MIPS from OpenWRT.
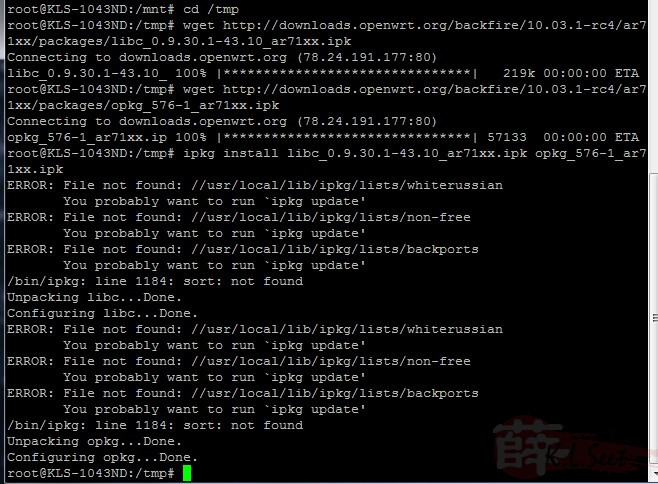
Again, make sure the device is accessible to internet, type the following:
cd /tmp
wget http://downloads.openwrt.org/backfire/10.03.1-rc4/ar71xx/packages/libc_0.9.30.1-43.10_ar71xx.ipk
wget http://downloads.openwrt.org/backfire/10.03.1-rc4/ar71xx/packages/opkg_576-1_ar71xx.ipk
ipkg install libc_0.9.30.1-43.10_ar71xx.ipk opkg_576-1_ar71xx.ipk
[Note: Be patient, wait for it to complete before entering next line. There will be some error message, it's ok to ignore it.]
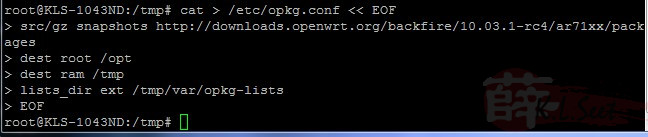
Type the following to set the config file:
cat > /etc/opkg.conf << EOF
src/gz snapshots http://downloads.openwrt.org/backfire/10.03.1-rc4/ar71xx/packages
dest root /opt
dest ram /tmp
lists_dir ext /tmp/var/opkg-lists
EOF
Basically the Optware package has been downloaded and installed, type "exit" to exit PuTTY.
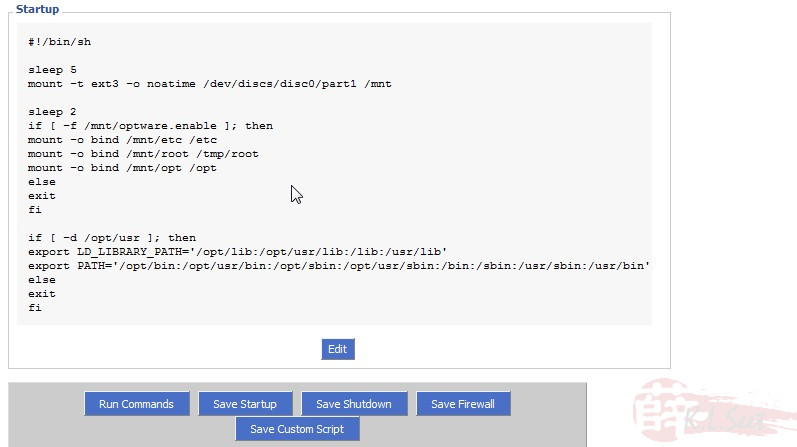
Now go to the device "Administration --> Commands" tab, type the following on the Command Shell and "Save Startup" script:
#!/bin/sh
sleep 5
mount -t ext3 -o noatime /dev/discs/disc0/part1 /mnt
sleep 2
if [ -f /mnt/optware.enable ]; then
mount -o bind /mnt/etc /etc
mount -o bind /mnt/root /tmp/root
mount -o bind /mnt/opt /opt
else
exit
fi
if [ -d /opt/usr ]; then
export LD_LIBRARY_PATH='/opt/lib:/opt/usr/lib:/lib:/usr/lib'
export PATH='/opt/bin:/opt/usr/bin:/opt/sbin:/opt/usr/sbin:/bin:/sbin:/usr/sbin:/usr/bin'
else
exit
fi
Click "Save Startup" to save it as startup script permanently.

Exit PuTTY and reboot the device.
Once re-booted, login through PuTTY again, type the following to test package update:
export LD_LIBRARY_PATH='/opt/lib:/opt/usr/lib:/lib:/usr/lib'
export PATH='/opt/bin:/opt/usr/bin:/opt/sbin:/opt/usr/sbin:/bin:/sbin:/usr/sbin:/usr/bin'
opkg update
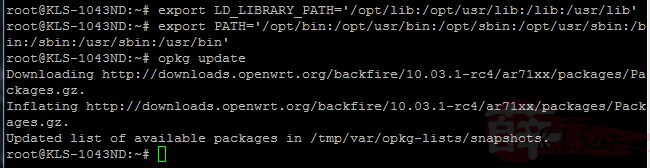
The package is updated correctly without any error.
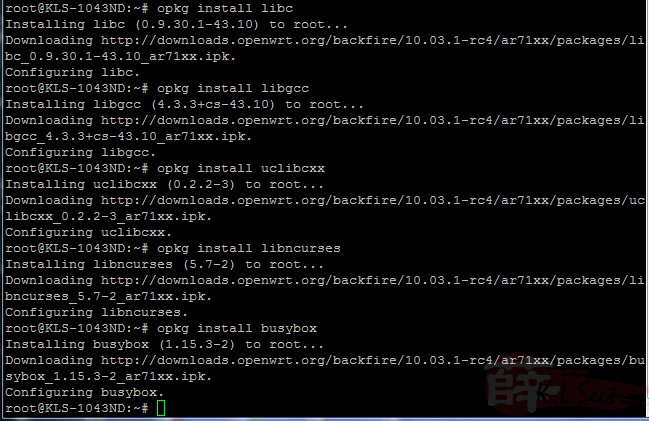
Now type the following to install the necessary packages:
[Note: it is important to install these, otherwise it might not work properly later on !]
opkg install libc
opkg install libgcc
opkg install uclibcxx
opkg install libncurses
opkg install busybox
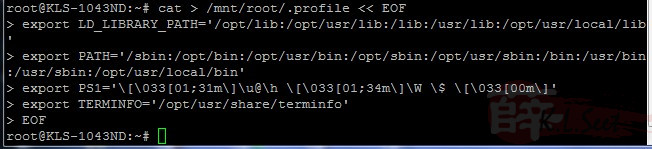
Instead of typing the above each time you want to install/update package, type the following:
cat > /mnt/root/.profile << EOF
export LD_LIBRARY_PATH='/opt/lib:/opt/usr/lib:/lib:/usr/lib:/opt/usr/local/lib'
export PATH='/sbin:/opt/bin:/opt/usr/bin:/opt/sbin:/opt/usr/sbin:/bin:/usr/bin:/usr/sbin:/opt/usr/local/bin'
export PS1='\[\033[01;31m\]\u@\h \[\033[01;34m\]\W \$ \[\033[00m\]'
export TERMINFO='/opt/usr/share/terminfo'
EOF
It will create a script, so next time just type "opkg update" will do.
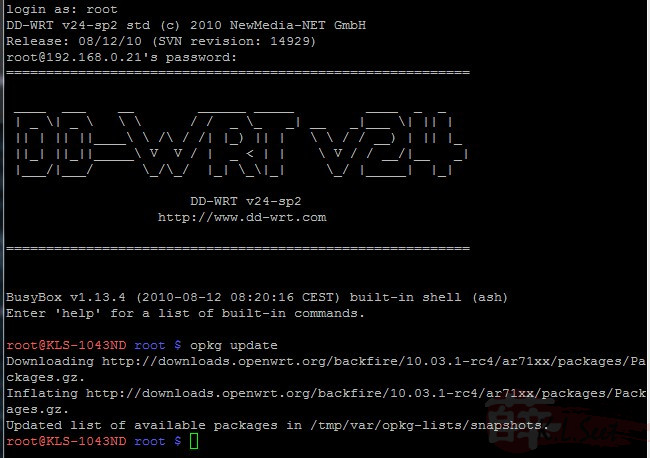
Exit PuTTY and re-logon again, you should see the following colour coded.
Type:
opkg update
The package is updated correctly.
Optware installation is completed, you are now free to install other packages ! 