


RT-N12-B1 Beta Firmware & Setup for UniFi
The beta firmware is from ASUS which I've assisted in testing based on my Huawei HG850a and to provide feedback to their engineer team accordingly.
The instruction is clear enough, please spend some time to read through, fully understood it before email me.
Should there be any issue which I'm able to duplicate the same issue, I'll do my best to forward to ASUS engineer for further investigation.
Please note I don't own the firmware and I don't sell the product either, you buy and flash at your own risk.
UniFi Setup Pre-Requisite:
- Download the latest beta firmware (at the bottom of this page)
- Perform clean flash, read carefully & fully understood the Factory Restore procedure through WebGui . (Note: If fail or brick, then use Firmware Restoration (Win7) method)
- Get ready your UniFi PPPoE user ID & password (it's case sensitive!), it was written on the installation sign-off document, under the section "High Speed Internet - xx Mbps". If you are not sure, call TM CS, just tell them you want to change your own router, they MUST provide you !
- Setup as per following guide. (Again, during setup, DO NOT connect WAN or WiFi, only connect 1 cable to the device's LAN 2/3)
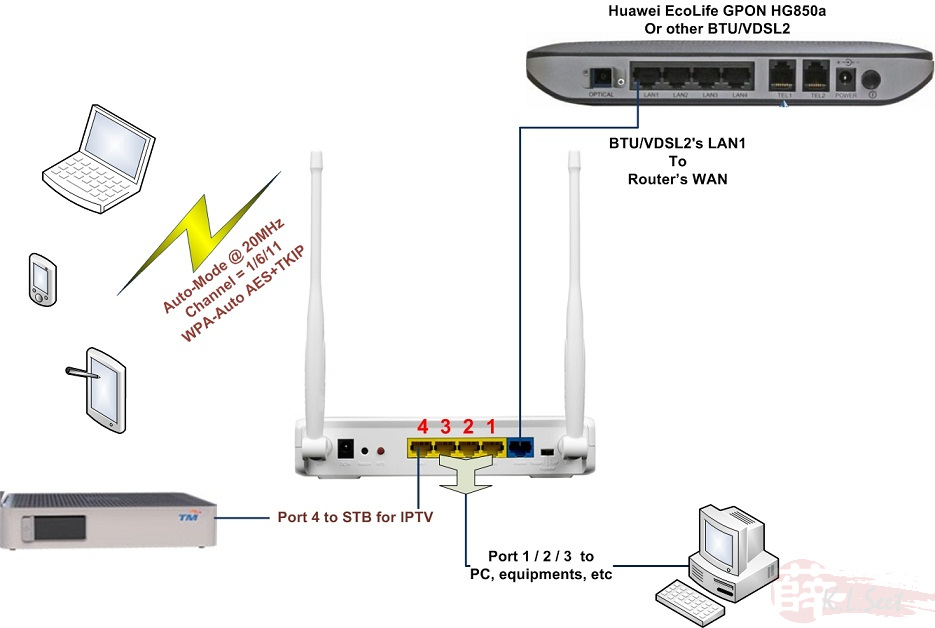
- Connect as per diagram (at the end of this article), ensure you connect the cables to the correct ports !
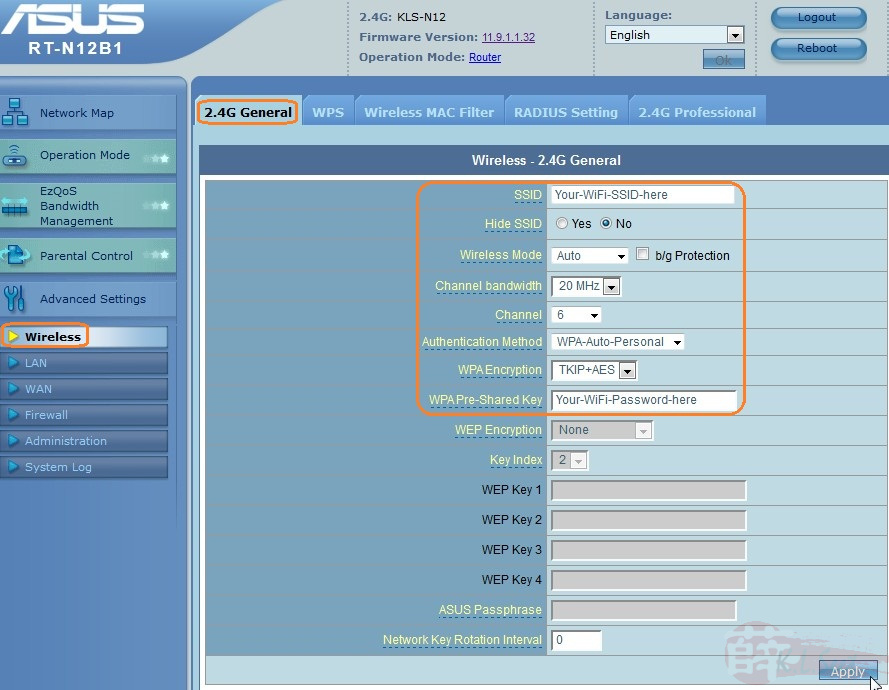
WiFi
After clean flash, go straight to "Wireless --> 2.4G" tab, setup as follows, please note:
- always set your WiFi password with at least more than 10 characters
- for high density area where there are lots of WiFi around you (may use Xirrus WiFi Inspector to check), set at least 5 Channel number away from those few closest
Click Apply when done
Click "WPS" tab, to Disable WPS if not require
Cick Apply when done

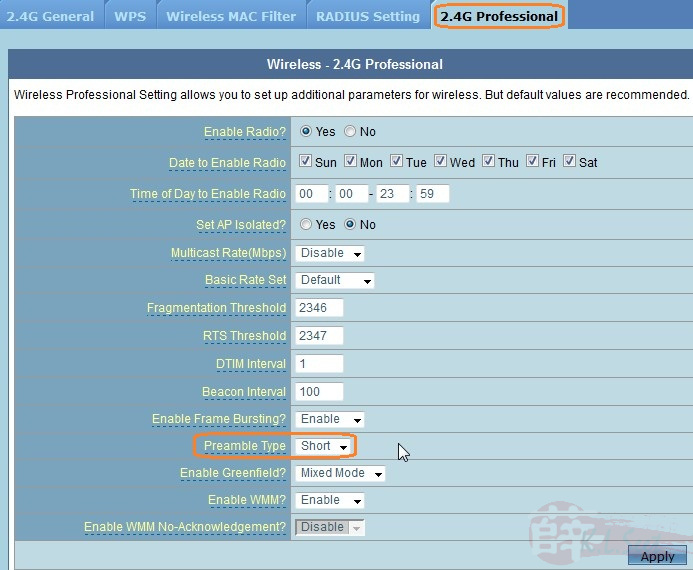
"2.4G Professional" tab, set Preamble to short if no devices use wireless B
Click Apply when done
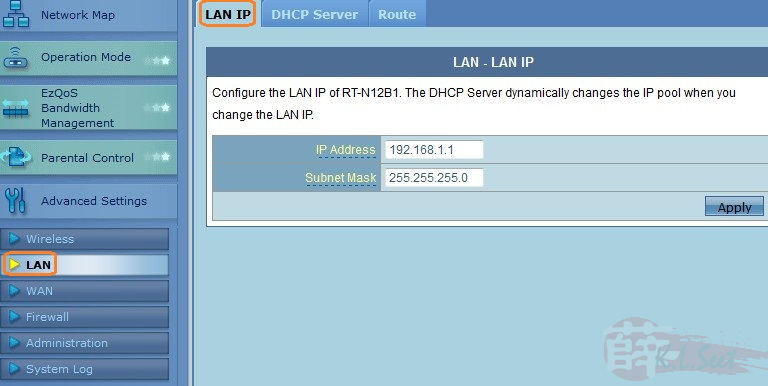
LAN
Go to "LAN --> LAN IP" tab, the device default IP is 192.168.1.1, change this only if needed
If change, click Apply when done, the device will re-boot, unplug your LAN able, wait for 2mins then re-connect again to continue
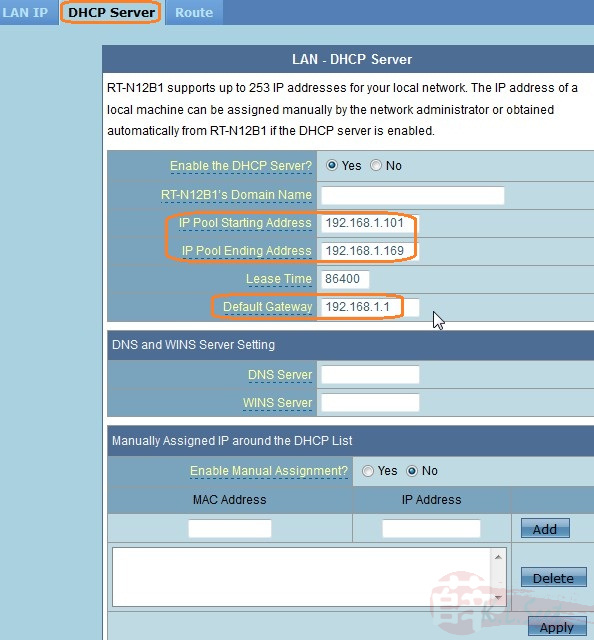
Click "DHCP Server" tab, enter the device's IP as the Gateway
Click Apply when done
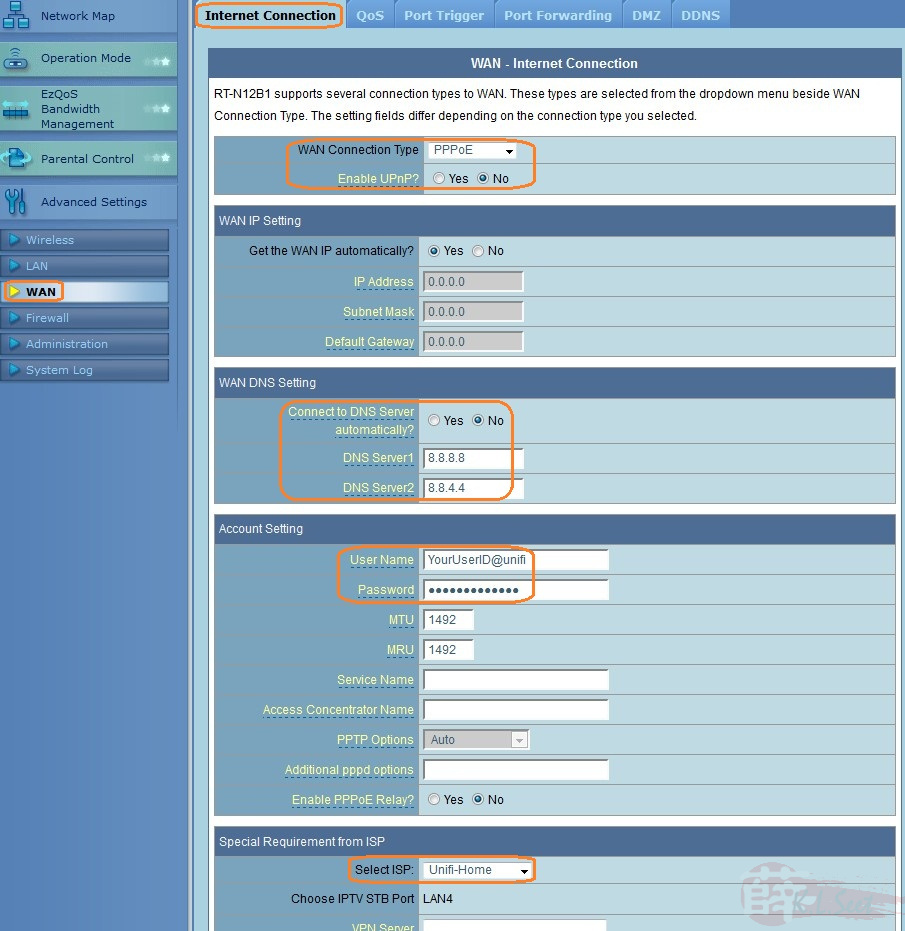
WAN
Go to "WAN --> Internet Connection" tab, setup as follows, take note the PPPoE user ID & password is case sensitive !
Click Apply when done
Firewall
Go to "Firewall --> General" tab, enable to DoS protection
Click Apply when done

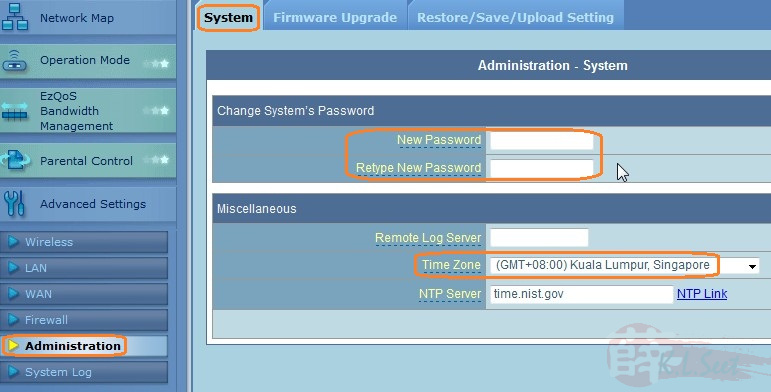
Administration
Go to "Administration --> System" tab, change the device admin password, select the correct Time Zone
Click Apply when done, system will prompt to re-logon with the new password
Basic setup is completed:
- re-boot the device
- close the browser
- unplug LAN cable
- wait for at least 2mins, logon to the device again
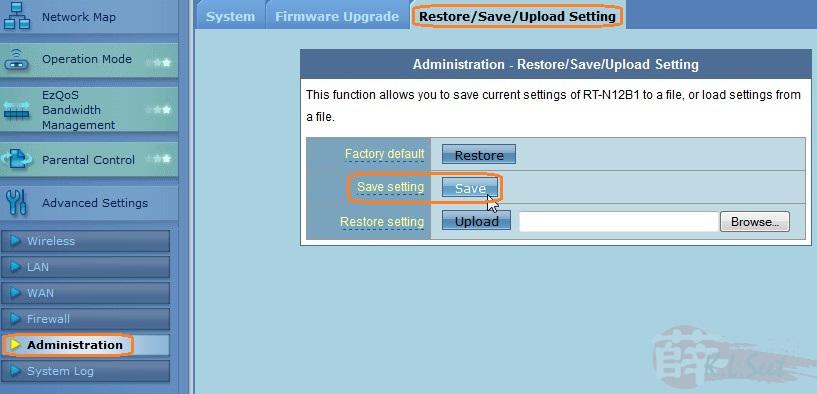
Go to "Administration --> Restore/Save/Upload" tab, save the setting for backup purpose
Always backup the setting BEFORE & AFTER making any changes
Once it works, try NOT to:
- change or mess around the settings (if corrupt or become unstable, always perform Factory Restore again, then restore your last good setting)
- use the EzQoS function, also don't enter anything on the Manual uplink QoS
- keep the router logon session constantly on (login only when necessary, always clear browser cache, close & re-open new to login, avoid IE)
You may continue the following setup only if you know what you are doing.
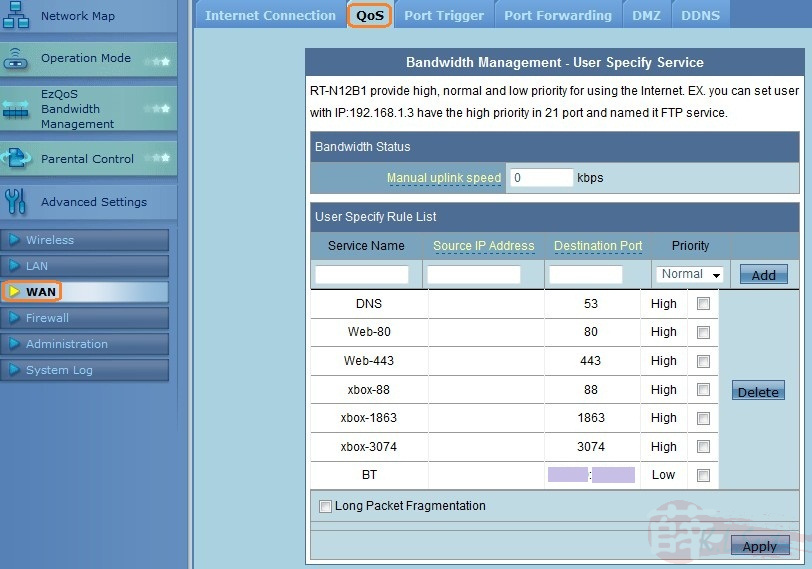
QoS
Go to "WAN --> QoS" tab, the following example set web browsing & Xbox to high, and set BT torrenting with range (eg, 60000:63999) to low.
Set your services/ports priority, Click Apply when done
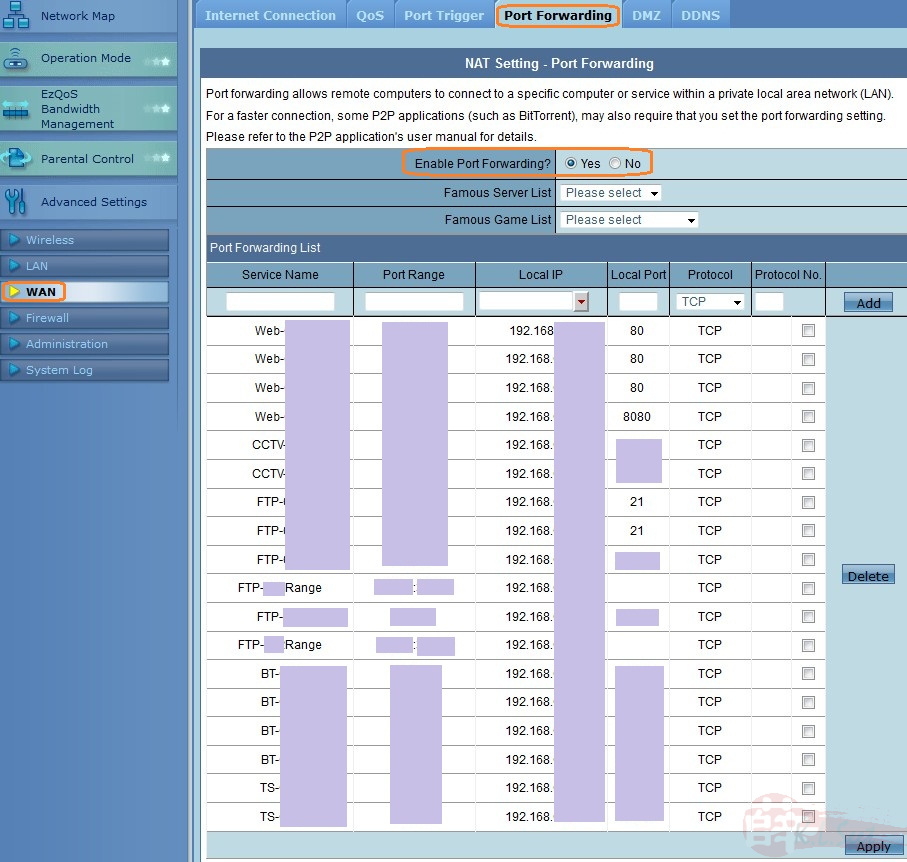
Port Forward
Go to "WAN --> Port Forwarding" tab, firstly click on "Enable", then "Apply"
Setup your services' port(s) forward accordingly, Click Apply when done
DDNS
Setup similar to RT-N16
Beta Firmware for UniFi
2011 Nov 22
Beta firmware version RT-N12B1_11.9.1.132 (MD5: e99e0cbb1f7d4e75d6d650fe603e25d2)
Connection Diagram
- Turn off all equipments, wait for at least 2 mins
- Connect as per following diagram, check & re-check again make sure you connect those cables to the right ports !!
- Power on BTU/VDSL2 first, wait at least 1 min, make sure the VoIP is working
- Power up the device, wait for at least 1 min, make sure the IPTV is working, enjoy !!

.